Monday, February 28, 2011

Hootie Hoo! Owl Softies!

For their 2nd birthday, I decided to make my cousin's twin son and daughter these owl "softies" from a pattern I found online.  They were SO much fun to make, I decided to make one for a co-worker's new son.  I used left-over fabric from the baby quilts I made for the twins two years ago - glad I am a fabric hoarder!  You can see the quilts I made in an earlier post. 
I used three fabrics for the body plus some craft felt for the eyes and beak.


I think my favorite part is the dangly legs!

Fun project! 
So, for those of you willing to spend a little time behind the sewing machine, here's the link.  They really were pretty easy, just a little time-consuming . I probably spent about 3 hours on each one. 
http://www.newgreenmama.com/2010/09/hootie-upcycled-owl-tutorial.html

Cheese Platter

First, I would like to thank Bonnie for asking me to be a part of her crafty blog. Crafts are so much fun! I will be contributing pictures of my food presentations I put together at my work!

Cheese Please! Every Friday we have a Wine and Cheese Party, where I put together both a fruit and and a cheese platter. Here is this past weeks cheese platter! A few of the cheeses I used were: Blue Cheese, Brie, Colby, Swiss, and a Lemon Rind flavored cheese.


Saturday, February 26, 2011

Knit and destroy!

Has anyone else literally been awake at 3am thinking of how scary and difficult a gusset heel must be? NO? Ok its just me then.
Knitting has taught me that you'll always be intimiated by your projects until you just get 'em started!
This is my first pair of socks! I recommend starting with smaller feet than I did, sorry hubbies...

Saturday, February 19, 2011

Introducing...Krafty Krissy!

I would like to introduce to you a dear friend, Kristina or Krafty Krissy as she is known in the blogger world!  Kris is a true artist.  I am looking forward to her posts on the beautiful array of foods she prepares as well as the pottery and other Krafty projects she comes up with!  Please check out her blog to the right, you will be happy you did!  Welcome Sister Kris!

Friday, February 18, 2011

Quilts fo yo crib!

I'm unsure how this obsession began - probably watching my mother and grandmother carefully piece together quilt tops and assemble beautiful finished products...  I love my home made quilts and I will never get rid of them, except to pass them on to my own children some day.  Crib-size quilts really are pretty easy, as long as you keep them SIMPLE! Patchwork quilts are the best kind, in my opinion.
This was the first quilt I ever made.   My dear friends from work provided the fabric for the squares, and I put them all together.  We presented the finished quilt to our co-worker and friend, Dave for his new son. The best part about this quilt is that it has four different personalities wrapped up into one.  
Quilt #2 - for my friend Kelly's baby shower.  Fabrics are from Hobby Lobby. The layers are bound together with yarn ties and the edges are actually the backing wrapped around the front side creating a nice border.

Quilts #3 and #4 - My cousin Emily had the most beautiful twins, a boy and girl.  I tried to stick with Emily's fun style with the fabrics I chose (Hobby Lobby). 

Wednesday, February 16, 2011

Welcome Lisa and Katie!

So, I have decided I need to space my posts out a little so I don't poop out.  That's right, I said poop.  So, I would like to welcome two more contributors to the God Help the Sister Crafty Blog - my sister Lisa and my dear friend Katie!  Both very creative girls that I am sure will add so much to this blog.  I am looking forward to seeing my sister's decorating and party endeavors, and Katie's beautiful knitting projects!  Thanks for joining ladies!
In their honor, I would like to post a couple photos of their work:
For Easter one year we had the whole family decorate Easter eggs using sharpie markers and they came up with some great designs! I will post those pics at some point. Lisa usually shows all of us up with her fun creations! Welcome Lisa!

While sitting around the living room one day, Katie and I decided that the pheasant above the fireplace needed a little something.  She actually knit this tiny hat and scarf just for Phranny (that's the pheasant's name, by the way).  Since this time, the pheasant goes through several wardrobe changes throughout the year, much to my husband's dismay.  I will share those photos at some point.  Welcome Katie!

Sunday, February 13, 2011

Mr. Army Man Pageant

Some families sit around the table telling stories, some argue about who gets to host Thanksgiving dinner, some just watch TV in silence.... Not my family.  Last year at Easter, I hosted Easter dinner at my house - about 25 of us.  Instead of sitting around after dinner, we had a little competition - an army man pageant.
The army men came from the Dollar Tree - I think they came in packs of five or six for a dollar.  The embellishments came mostly from Lisa's scrap booking box plus some ribbons and felt.

We basically gave everyone an army man, set out the embellishments and let everyone go to town!

I am always amazed at how creative my family is...


We voted on the best, and the winners received tiny golden trophies (also a find at Dollar Tree).      I would LOVE to hear your ideas for the next family gathering!  The cheaper, the better!


Saturday, February 12, 2011

Oh Baby!

I had the honor of co-hosting a baby shower for a dear friend, Trista on a beautiful August afternoon.  Her sister Kristina and I planned over the internet for weeks (Before Kris moved to CO).  One of my favorite parts about this shower, aside from the amazing friends who were there, was the cohesiveness of the entire event.  We took the color theme from the bedding Trista picked out and Kris and I ran with it! The best thing was that we didn't have to break the bank to pull it off!
That's the beautiful Mommy-to-Be on the right.
I stayed with a three-color scheme and found table cloths, napkins, plates, cups, etc at Party City that coordinated well.  The key was to alternate colors.  Not all table cloths were the same color, not all napkins, plates, etc were the same color. 

Tissue paper poms were so easy to make. Here's a link to the Martha Stewart web site that takes you through the steps to make these fun decorations.  http://www.marthastewart.com/how-to/tissue-paper-pom-poms-how-to


Any easy addition to the tables - lots of dots!  We cut out a bunch of circles from scrapbook paper and used them on the tables that needed a little extra something!

Simple and inexpensive, these cupcakes are even prettier with fabric flowers found at the Dollar Tree.

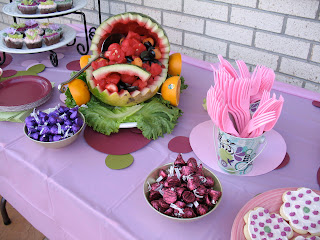
Kris is quite the crafts-woman!  This was actually a lot easier than she thought it would be. She started out by cutting straight into the melon from two sides, then she scooped out the melon and carefully carved the zig zag pattern.  Orange halves were attached with tooth picks.


The Dollar Tree is really such a great place to find little tubs for things like this - we used them for note cards, favors and door prizes.  Then Trista took them with her at the end of the day to use in the nursery for small items.  One small touch that goes a long way is printing out instructions for your guests.  We printed out signs asking guests to address an envelope, take a favor, etc and put them in frames that we sent home with Trista.  

A gifted artist, Kris painted some wall hanging letters for the nursery which really added to the decor of our guest book table.

Friday, February 11, 2011

Extreme Office Makeover - Youth Pastor Edition!

As a youth pastor, my husband personifies all that is crazy and fun.  Our house frequently gets targeted by teenagers equipped with toilet paper, metal flamingos, tiny army men and the like.  A crazy fun guy needs a crazy fun office, right?  We spent the better part of three days a couple years ago transforming an ugly, gray, mismatched office at the church into a funky, cozy place where Jarrod is productive, but his kids love to come hang out. Below are a couple before and after shots of the office.  I used Benjamin Moore's Personal Color Viewer (you can find it at www.benjaminmoore.com) to see what the space might look like with different paint colors on the walls.  We settled on a nice chocolate brown and a vibrant lime green, paired with brown, black and silver accents.
Jarrod built zero shelves from mdf, then we sprayed them silver.  I made a quick curtain from some inexpensive fabric we found. 
Just bringing in matching furniture made all the difference in the world.  We made a simple coat rack and painted it with leftover wall paint.

The modular couch allows Jarrod to move things around to accommodate more people.  The ottoman provides storage for a big cozy blanket his kids use when they have Bible studies.  I found a photo online of a tree I liked, so I used it to inspire this two-part painting. By splitting the painting up and wrapping it around the corner, it gives the room more dimension. 
Before...ugh! Only one seat made it tough for visitors to get comfortable.

Blah! Need I say more?

Thursday, February 10, 2011

Ladie's Brunch February 2011


Lisa and I decided to host a brunch for the women in our family.  Setting the table was so fun! Heart-shaped ramekins were perfect for fruit and candy.  The shimmery black fabric is actually a shawl I bought with a formal dress in college!
Lisa cut paper hearts from scrapbook paper and strung them on black ribbon.


We enjoyed great food - Lisa is an amazing cook!  Fruit and yogurt parfaits, frittata, and the now famous "Vir-Mosa Sunrise" (sparkling grape juice, OJ, and grenadine).   


Nothing says love like chocolate!  The place cards took shape as Hersheys candy bars wrapped in black and white gift wrap and ribbon with each person's name.


A wonderful morning with my favorite ladies! From left to right: Grandma Lois, Aunt Patti, Lisa, Me, Mom (Susan) and Grandma Sandy.

Christmas Crafts 2010

Throw Pillows for Kaycie's Birthday.  They match the Christmas quilt I made for her - pic to come as soon as I can find it!

Mom Artim's Christmas throw quilt. I came up with the pattern on the computer and worked out all the measurements for fabric.  Came up with a good template for future quilts!

Mom Jackson's Christmas throw quilt. Green, brown and dusty rose.

B'GAWK!

Some may not think this has anything to do with crafts - I beg to differ.  Jarrod had to create a sort of self portrait using a small rubber chicken for work.  We came across a Santa sitting on a Harley at Home Depot.  It felt somehow wrong, but we ripped Santa's head off and stuffed the rubber chicken inside the suite, painted the red pants black, added Oakleys and Under Armor logos and, VOILA - you have my husband in chicken form! (Did I mention the chicken bounces around to "Born to be Wild" at the push of a button?)

Creating A Casino

Jarrod's 25th Birthday began with a smokin' present - no really, it was a smoker grill!
My Dad is the ultimate crafty man - he came up with the design for this Vegas-style sign. It's primarily built with 1/4" mdf.  I used craft paint to finish it off. 
Chris and Meg at Jarrod's 25th Casino Birthday

The Poker Table was a hit - the card suites above were cut from craft foam from Hobby Lobby and hung with fishing line.
One of my favorite projects - playing card images blown up and printed onto 11x17 paper, glued to foam core and suspended with fishing line.  The other side of the cards had Jarrod's very own 25th Birthday logo.
No Casino is complete without a buffet!

That Meg, she's a gambling fool! 

Images printed onto 11x17 paper, glued to foam core, then cut out with a very sharp craft knife - these are so easy to store for later!


As long as you can download a high-resolution photo, applying it to foam core is easy. I found some images and created others using power point.